案例源码:本地下载
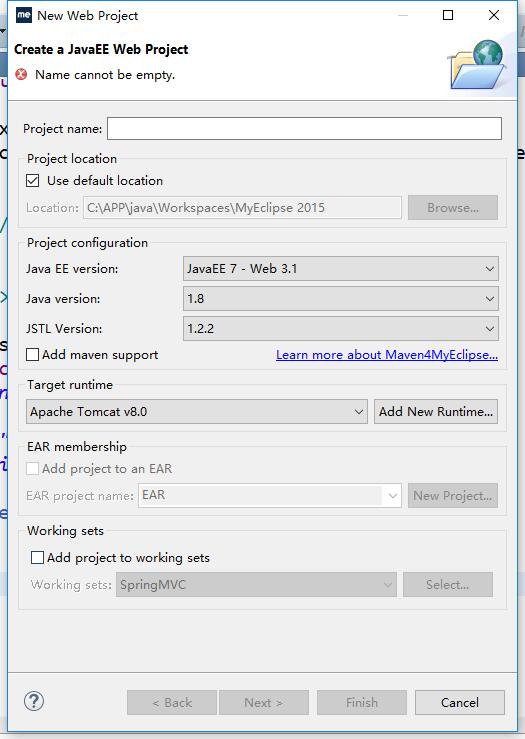
1.创建Web Project

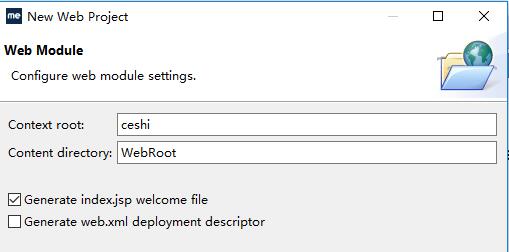
2.自动生成web.xml

3.添加Spring
myeclipse>>project facets>>install Spring Facet
4.web.xml添加核心控制器
web.xml
<?xml version="1.0" encoding="UTF-8"?>
<web-app xmlns:xsi="http://www.w3.org/2001/XMLSchema-instance" xmlns="http://xmlns.jcp.org/xml/ns/javaee" xsi:schemaLocation="http://xmlns.jcp.org/xml/ns/javaee http://xmlns.jcp.org/xml/ns/javaee/web-app_3_1.xsd" id="WebApp_ID" version="3.1">
<display-name>mvc01</display-name>
<welcome-file-list>
<welcome-file>index.html</welcome-file>
<welcome-file>index.htm</welcome-file>
<welcome-file>index.jsp</welcome-file>
<welcome-file>default.html</welcome-file>
<welcome-file>default.htm</welcome-file>
<welcome-file>default.jsp</welcome-file>
</welcome-file-list>
<context-param>
<param-name>contextConfigLocation</param-name>
<param-value>classpath:applicationContext.xml</param-value>
</context-param>
<listener>
<listener-class>org.springframework.web.context.ContextLoaderListener</listener-class>
</listener>

<!– Spring MVC的核心控制器配置 –>
<servlet>
<servlet-name>DispatcherServlet</servlet-name>
<servlet-class>org.springframework.web.servlet.DispatcherServlet</servlet-class>
<init-param>
<param-name>contextConfigLocation</param-name>
<!– Spring MVC部分的配置,分开时叫spring-mvc.xml
同时也可以统一配置,在applicationContext.xml文件中进行配置 –>
<param-value>classpath:applicationContext.xml</param-value>
</init-param>
</servlet>
<!– Spring MVC的核心控制器URL配置 –>
<servlet-mapping>
<servlet-name>DispatcherServlet</servlet-name>
<!– 接收的请求的格式,如果所有请求都提交到这个Servlet,可以使用"/" –>
<url-pattern>*.xhtml</url-pattern>
</servlet-mapping>
</web-app>
5.配置SpringMVC
applicationContext.xml
<?xml version="1.0" encoding="UTF-8"?>
<beans xmlns="http://www.springframework.org/schema/beans"
xmlns:xsi="http://www.w3.org/2001/XMLSchema-instance"
xmlns:p="http://www.springframework.org/schema/p"
xmlns:mvc="http://www.springframework.org/schema/mvc"
xmlns:context="http://www.springframework.org/schema/context"
xsi:schemaLocation="http://www.springframework.org/schema/mvc http://www.springframework.org/schema/mvc/spring-mvc-4.1.xsd
http://www.springframework.org/schema/beans http://www.springframework.org/schema/beans/spring-beans-4.1.xsd
http://www.springframework.org/schema/context http://www.springframework.org/schema/context/spring-context-4.1.xsd">

<context:annotation-config />
<context:component-scan base-package="com.controller" />

<!– Spring MVC配置开始 –>
<!– Spring MVC的注册处理器 –>
<mvc:annotation-driven/>
<!– Spring MVC的视图处理器 –>
<bean id="internalResourceViewResolver"
class="org.springframework.web.servlet.view.InternalResourceViewResolver">
<property name="prefix" value="/"></property>
<property name="suffix" value=".jsp"></property>
</bean>
<!– Spring MVC配置结束 –>

</beans>
6.创建Controller
DemoController.java
package com.controller;

import org.springframework.stereotype.Controller;
import org.springframework.web.bind.annotation.RequestMapping;

@Controller("DemoController")
@RequestMapping("/demo")
public class DemoController {
    @RequestMapping("hello")
    public String hello(){
        System.out.println("DemoController.hello() is called…");
        return "index";
    }
}
7.在tomcat添加项目启动
浏览器运行:http://localhost:8080/mvc01/demo/hello.xhtml;到达This is my JSP page. 页面。

评论